
How to build oclif for windows with GitHub Actions
This article will provide an overview of how you can build and release an oclif application via GitHub Actions. The pattern we will implement supports the following workflow:
- Create a release in a project's repository on GitHub
- Publish the release, which will trigger a "workflow" in GitHub Actions via the Release Published event
- Workflow attachs results to the release as "artifacts," allowing them to be downloaded later
Technologies & Concepts
First, lets talk alittle about the technologies/concepts we'll be using.
oclif
"The Open CLI Framework" (oclif) is an open-source framework for building CLI (command-line interface) applications with standard technologies such as Node.js, JavaScript, and TypeScript.
oclif packaging support
oclif is especially appealing when you wish to produce binaries that work natively on multiple operating systems. This support is provided through several commands available on the oclif CLI. You can learn about this in more detail in the "Release" section on the oclif documentation website. Still, we'll give a brief overview of the strategies below.
Standalone Tarballs
For projects where you can not expect users to install node.js and npm, oclif provides functionality for producing builds that will output standalone tarballs. Standalone tarball builds can be created for multiple supported operating systems. For the sake of this article, we will be working to produce an installable Windows executable.
NPM
Because oclif is built around node.js and npm, an oclif app can be published directly to npm using the standard npm publish command. This strategy allows existing node.js and npm users to easily install the application globally using the npm install -g <app_name> command.
This strategy is likely sufficient and the most straightforward for public projects or projects where the target user base is expected to have node.js and npm installed.
GitHub Actions
GitHub actions is a CI/CD solution provided directly from GitHub that allows you to run automation tasks based on various "events" that occur on repositories hosted on github.com.
Building with GitHub Actions
GitHub actions can run tasks and commands on a repository in response to events. One supported event is the "release published" event, which we will use to trigger a workflow.
GitHub Releases
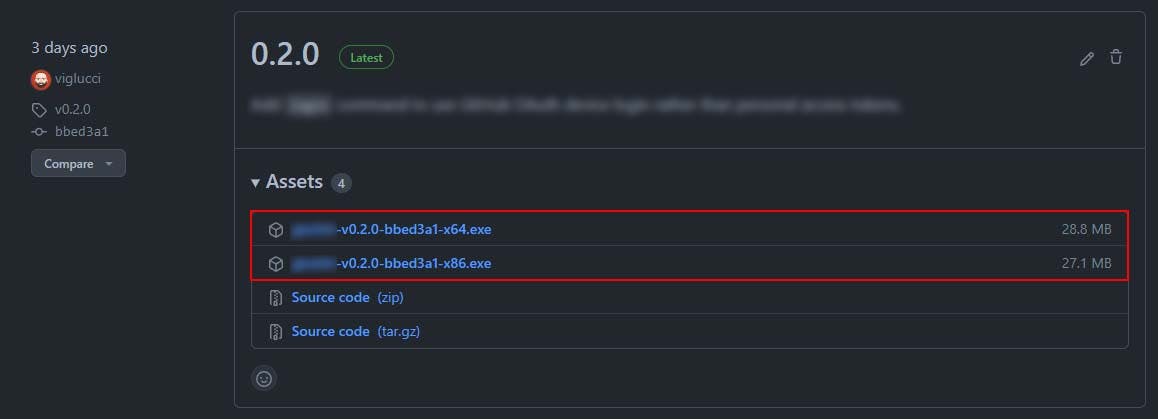
Releases on GitHub allow maintainers to communicate meaningful milestones for their projects and distribute "artifacts" related to those milestones. For this example, we will be creating a new Windows installer for a CLI application and attaching it to the desired release as an "artifact."
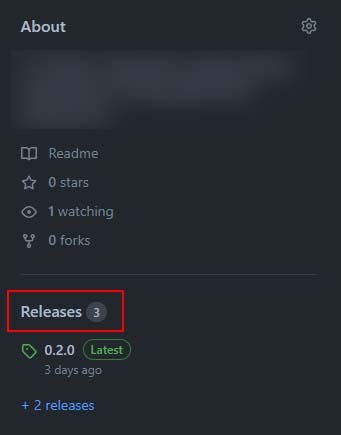
To view the releases for a repository on GitHub, you can visit the releases page at github.com/REPOSITORY_NAME/releases or click the "releases" header on the repositories index page.
The releases header can be challenging to find, so I've provided an example below.
Getting Started: Create a workflows file
To get started, we need to ensure that we have a .github/workflows directory created in the repositories root directory.
example: project-folder/.github/workflows
Next, inside the .github/workflows directory, create a release.yml directory. This YAML file will configure the "actions" that will run in response to the events on the repository.
example: project-folder/.github/workflows/release.yml
Setup event triggers
This configuration will trigger the workflow anytime a new release is published on the repository.
# .github/workflows/release.yml
on:
  release:
    types: [published]
...
Configure jobs
This configuration provides a few bits of functionality to the workflow:
- Creates a list of "jobs" that will run when the workflow triggers
- Defines that the job should run on and use the latest "ubuntu-latest" image as a base
- Defines a "strategy," which allows us to define variables that can be referenced later
# .github/workflows/release.yml
...
jobs:
  release:
    name: release ${{ matrix.target }}
    runs-on: ubuntu-latest
    strategy:
      fail-fast: false
      matrix:
        include:
          - target: win
            artifact_glob: "./dist/win32/*"
...
Strategy matrix variables
The strategy.matrix is a configuration that allows for running workflow jobs with a combination of variables. Matrix is generally helpful if you wish to run the same set of tasks with different combinations of variables, such as versions of dependencies, or in our example, arguments passed to a CLI command.
For our purposes, we are using a strategy.matrix that targets a Windows build but could be extended with additional entries to target other platforms later.
You can learn more about matrix configurations here.
Steps
Last we will configure the "steps" that will be run when the job is executed.
# .github/workflows/release.yml
...
    steps:
    - run: sudo apt update
    - run: sudo apt install nsis p7zip-full p7zip-rar -y
    - uses: actions/checkout@v2
    - uses: actions/setup-node@v2
      with:
        node-version: '16'
    - run: npm install -g yarn
    - run: yarn
    - run: yarn global add oclif
    - run: oclif pack ${{ matrix.target }} -r .
    - name: Attach artifacts to release
      uses: svenstaro/upload-release-action@v2
      with:
        repo_token: ${{ secrets.GITHUB_TOKEN }}
        file: ${{ matrix.artifact_glob }}
        file_glob: true
        overwrite: true
        tag: ${{ github.ref }}
A description of what each "step" accomplishes is provided below:
run: sudo apt update- Updates the libraries already installed on the
ubuntu-latestbase image to ensure we have the latest and greatest
- Updates the libraries already installed on the
run: sudo apt install nsis p7zip-full p7zip-rar -y- Installs several dependencies required to package the application as a Windows installer using
makensis
- Installs several dependencies required to package the application as a Windows installer using
uses: actions/checkout@v2- Uses a prebuilt GitHub action to check out the repository source code
uses: actions/setup-node@v2- Sets up node.js and npm, specifically using version
16of node.js
- Sets up node.js and npm, specifically using version
run: npm install -g yarn- Installs
yarnglobally so it can be used in later commands
- Installs
run: yarn- Calls
yarnto install the dependencies listed inpackage.json
- Calls
run: yarn global add oclif- Installs the
oclifCLI globally viayarn
- Installs the
run: oclif pack ${{ matrix.target }} -r .- Calls the
oclifCLI to package the application using the "target" previously defined in the matric config - example:
oclif pack win -r .will package for Windows
- Calls the
uses: svenstaro/upload-release-action@v2- Uses a prebuilt GitHub action (svenstaro/upload-release-action@v2) to attach the artifacts from the
oclif packcommand onto the GitHub release with the tag denoted bytag: ${{ GitHub.ref }} - Notice the
fileattribute with the valuematrix.artifact_glob? This value references the variable we originally defined in thematrixconfiguration. Practically speaking, this will result in every file in the/dist/win32/directory being attached to the GitHub release.
- Uses a prebuilt GitHub action (svenstaro/upload-release-action@v2) to attach the artifacts from the
Putting it all together
Below is an example of the entire release.yml file.
# .github/workflows/release.yml

on:
  release:
    types: [published]

jobs:
  release:
    name: release ${{ matrix.target }}
    runs-on: ubuntu-latest
    strategy:
      fail-fast: false
      matrix:
        include:
          - target: win
            artifact_glob: "./dist/win32/*"
    steps:
    - run: sudo apt update
    - run: sudo apt install nsis p7zip-full p7zip-rar -y
    - uses: actions/checkout@v2
    - uses: actions/setup-node@v2
      with:
        node-version: '16'
    - run: npm install -g yarn
    - run: yarn
    - run: yarn global add oclif
    - run: oclif pack ${{ matrix.target }} -r .
    - name: Attach artifacts to release
      uses: svenstaro/upload-release-action@v2
      with:
        repo_token: ${{ secrets.GITHUB_TOKEN }}
        file: ${{ matrix.artifact_glob }}
        file_glob: true
        overwrite: true
        tag: ${{ github.ref }}
Conclusion
Once the GitHub Action workflow file has been added to the repository, future published releases will trigger the workflow. The produced artifacts from the workflow will be attached to the release and available for download.
Note: Ensure that release versions are tagged with a corresponding Git tag, and the appropriate tag is added to the release on GitHub, as these tags are required by the svenstaro/upload-release-action@v2 action. Tagging a release version is as easy as using the npm version or yarn version commands.